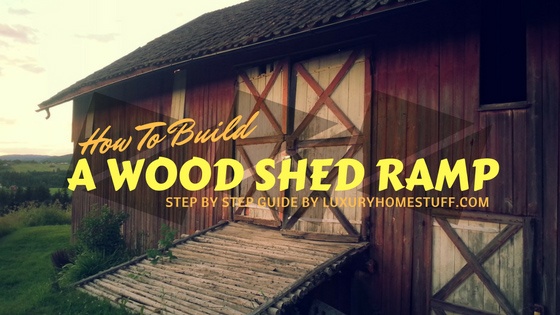
If you do not own a shed ramp already it is time to get one. These are very helpful in getting things inside the shed with ease like your cart, garden trolley or anything that comes with a wheel or can be slid in.
This is a very interesting project for all the DIY lovers but make a sturdy shed ramp plan before getting down to build it. The first thing that you need to keep in your mind is to use the best quality materials.
More...
How To Build A Shed Ramp In Six Steps?
The second advice would be to get some help and work with attention; although we know that you like to be independent and self-sufficient, this is one project which you can’t do all on your own.
So without further ado, let’s get down to business and get you the things you need to build the wood shed ramp.
Must Have Tools To Build A Shed Ramp
Image | Item | Description |
|---|---|---|

| Safety gloves |
|

| Safety glasses |
|

| Miter saw |
Click Here to find out the best miter saw here. |

| Jigsaw |
Find out the best jigsaw here. |

| Chalk line | |

| Tape Measure |
|

| Spirit level | |

| Carpentry pencil | |

| Drill machinery | BLACK+DECKER LDX120C 20-Volt MAX Lithium-Ion Cordless Drill/Driver. Find out the best cordless drills or best corded drills here. |

| Drill bits |
|
Materials
Don’t tire away just yet; here are the materials you need.
- 4 pieces of 2×6 – 50 1/2? long lumbers for Joists
- 9 pieces of 2×6 lumber – 45? long lumbers for slats
- 1 piece of 2×6 lumber – 45? long lumbers for support
- 2 pieces of 2×4 r – 13? long lumbers, 1 piece of 2×6 – 13? long lumbers for blockings
- 2 pieces of ½ screws.
So by now you can well imagine the kind of commitment and hard work you need to build the garden shed ramp: make sure
- You have enough time and people to help you.
- Also apply several coats of wood stain to the wood components and
- Use wood fillers to fill all the holes in the wood and get as smooth a surface as possible.
- Another important thing to remember while choosing materials is the material itself. While wood is definitely cheap, aluminum shed ramps are more practical, durable and well-worth the extra cost.
Wooden ramps need maintenance in the sense that you need to paint them once almost every year if not more as the wood decays and it might soon go beyond repairs when you have to change it all together.
The Steps To Build A Shed Ramp
Fit The Support
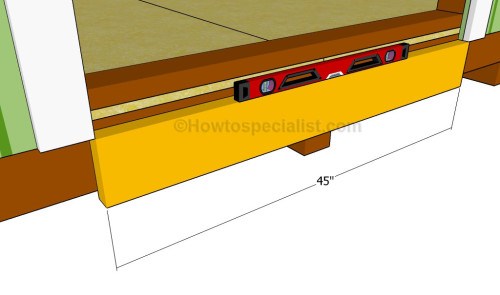
Fitting the support via How To Specialist
Your first step of this DIY shed ramp is to attach the 45” long support to the exterior portion of the frame. In order to do that, first cut the support in the correct size and then secure it with screws on the horizontal side.
Build The Joists
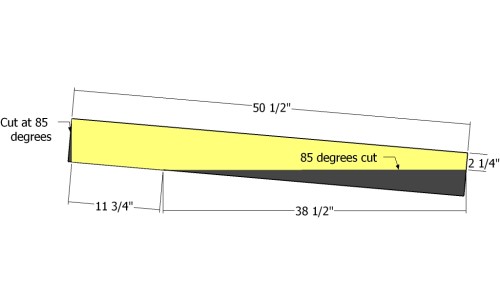
Building the joists via How To Specialist
Joists are pretty basic stuffs and need very less skill. Use the right saw, correct measurements and half your work is done.
Make sure you smooth the edges and build the other joists in the exact same manner and with the same level of precision: remember that you need all of them to be an exact copy of the others or the thing would not fit well.
Fit The Joists
Fitting the joists via How To Specialist
After you have built all the joists, attach them to the support. Use galvanized hangers so that the joints are rigid and sturdy. The last thing you would want after putting in so much effort is for the joints to be flimsy and come out within months.
Align the components with utmost care and precision and make sure all of them are well-aligned and equally spaced.
Fit The Blockings

Fitting the blockings via How To Specialist
After the joists come the blockings. Building the blockings requires a little precision and you need to secure them between the joists so that they fit perfectly.
For a wood shed ramp you need to drill pilot holes through the joists and secure them to the blockings using those 2 ½” galvanized screws.
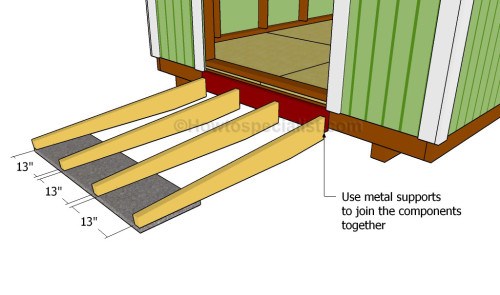
Fit The Slats
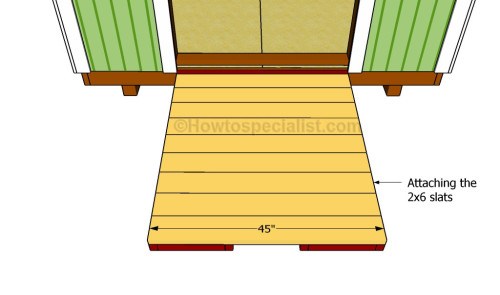
Fitting the slats via How To Specialist
Fitting the slat is a tricky part; you need to pay a lot of attention while performing this particular task. Attach the 2×6 decking to the support. The decking slat should be fitted from the top of the joists and then slowly moved to the bottom.
Make sure you do not split the wood and so you need to drill pilot holes into this one again and secure them with screws. The slats should be equally spaced as well and you can do that by placing a nail in between.
Final Works

How to build a shed ramp via How To Specialist
This is what the final thing will look like only when you have taken good care of the finishing touches.
- The holes should be filled and let out to dry for several hours and even days.
- You should also make sure to smooth the wooden surface with fine-grit sandpaper and
- Vacuum out the residues.
There are a few more things that you need to keep in mind while building garden shed ramps. The first thing to plan is
- The slope which depends on where you are going to put the ramp and what things you are going to move over it. Generally 20-30 degrees of slope suffices.
- The slope of the ramp will also depend on how big and long the ramp itself is. So for every 8 inches of the ramp length the slope needs to go up by 1 inch.
- Adding inches to the side of your doors is another thing that you should keep in mind besides the slope and length of the ramp itself.
- Don’t make the ramp surface too smooth because then things will just keep on slipping. With too smooth a surface things can as easily go down as they can go up, thereby increasing your effort instead of reducing it.
- That also doesn’t mean that you won’t smoothen the wood and keep splinters on it but paint the surface of the ramp with an anti-slip paint or may be rubberize it to improve resistance.
Check This Video For Some Extra Help
Build a Shed Ramp via TedsDixieSheds